~

“Vision is the art of seeing what is invisible to others.” ~ Jonathan Swift

Monday, December 31, 2012

...and a healthy New Year!

My family has an annual tradition of a New Year's Eve, potluck dinner.  This year, I am contributing these quinoa and kale "bites".  Knowing my family, I can count on a host of delicious--albeit rich and sometimes unhealthy--foods. It's always a good idea to whip up something anti-inflammatory so I can always have something wholesome to eat.  Plus, I have discovered that I can introduce others to healthy foods they might not have otherwise tried.

I created this recipe by melding a bunch of ideas together.  Serve warm as a tasty side dish.  I whipped up a yogurt dip as well.


Quinoa and Kale Bites

(makes approximately 28)

2 cups uncooked quinoa (I used red quinoa for extra nuttiness)
3 cups of vegetable or chicken stock
1 head of kale, shredded
1/2 cup of chives, minced
4 eggs, lightly beaten
1/2 cup shredded cheese
dashes of cumin, to taste
salt and pepper, to taste
olive oil

To make the quinoa, pour the quinoa and broth in a medium pot.  Bring to a boil then simmer, covered until the little "piggy tails" sprout.  This should take approximately 15 minutes.  Allow the mixture to come to room temperature.

Mix the kale, chives, cumin, salt, and pepper in a large bowl.  Then mix in the cheese and eggs along with the cooled quinoa.  Add a dash or two of olive oil to keep the mixture moist.  Then spoon the mixture into standard size muffin tins.  Use the back of your spoon to flatten the mixture.  Bake for 15-20 minutes at 350 degrees.

Garam Masala Yogurt Dip

2 cups of lowfat or nonfat Greek yogurt
1 tablespoon of garam masala (or curry powder)
1 tablespoon of lime juice
salt and pepper, to taste

Mix all ingredients and serve with the quinoa bites!

Happy and Healthy New Year!


Saturday, December 29, 2012

Looking back, looking ahead

Sorry that I haven't been posting as frequently.  Being a teacher isn't conducive to maintaining a blog, but I will try to be more on top of this!

I bring bittersweet news.  In September, I had a check-up and an unsettling discovery. After conducting an OCT scan, my doctor found some fluid (blood) in the back of my eye.  However, he was unsure if this was anything new.  The office recently acquired a newer, higher resolution camera so he was not sure if the activity had always been there and the old technology could not detect it.  The other option, however, was that this could be a new round of hemorrhaging.

So, he told me to come back in December to see how the situation progressed.  Between those two appointments, I definitely noticed a decline in my vision.  It was harder to read for long periods of time, and my stamina for grading also decreased.  I was worried...and I even started a blog post about it.  But then, I never finished that post because it was almost too scary to think about it.  After all, I had been injection free since 2009.  I suppose I got too comfortable.

Two weeks ago, I went in for another appointment and could not make out the eye chart at all.  Another scan revealed definite activity, and I walked out with my first Avastin injection in years.  I return in mid-January to see if the injection worked.

So, what does this mean?  I go back and forth. Sometimes, I blame myself for not maintaining my anti-inflammatory diet "better". Sometimes, I curse the diet and think that it must have been a sham.  Sometimes, I think that maybe the diet did work and I should be grateful for the three years that I had relative calm.

As 2013 approaches, I find myself in an ironically similar spot to the one I was in when I first began this blog.  I have been making more deliberate steps to adhering to the diet.  For me, this has meant eating mainly vegetarian meals and cutting out a great deal of sugar.  However, the evil holidays have meant nothing but sweet treats everywhere I turn!  I also love baking, so it's been quite hard to stick to anti-inflammatory eating.  Who can resist these peanut butter cookies?!

I am hopeful though, and I promise that 2013 will be focused on taking care of myself.

Happy New Year, everyone!

Thursday, July 19, 2012

Fruit Pops

I am an ice cream junkie.  Since starting the new diet, I have been pretty good at regulating my intake of junk food.  But I have two weaknesses: ice cream and potato chips.  While I haven't quite figured out how to kick the potato chip habit, I have found some solace in popsicles when it comes to my ice cream cravings!

Are they like ice cream?  No, not quite.  But they do the trick when I need something sweet and cool on hot summer days.

I used Tovolo popsicle molds and got them at Whole Foods for $12.  Typically, they are only $1 less so it wasn't bad for an impulse buy.  They work great and don't take up too much room in the freezer either.


(This popsicle features from top to bottom: mango/peach, mixed berry, and kiwi flavors.)

To make the popsicles, I use frozen fruit, nonfat yogurt, fresh lime juice, and agave (optional) for extra sweetness.  There is no hard and fast recipe, as I think much of this depends on your personal tastes for sweet vs. tart and creamy vs. icy.

Here are the basic steps:

1) Combine frozen fruit and a small amount of yogurt in a blender or food processor.


2) Taste the mixture and add more fruit, lime, or agave as needed.

3) Once it reaches the desired taste, pour the mixture into the pops molds.

4) For the striped effect (featured in the picture), you will have to make three separate batches of flavors.  Pour the first layer in, freeze for approximately 30 minutes, then repeat with each successive layer.

Tip: When ready to eat, run the frozen molds under some warm water to help loosen the popsicles.

Monday, July 9, 2012

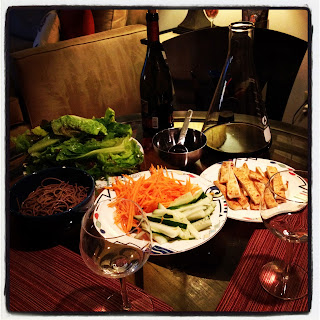
Soba and Tofu Spring Rolls

Last week's heat wave made turning on the stove or oven impossible.  So, faced with more CSA veggies, we set out to make a meal that was both health- and heat-friendly.  Try these Soba and Tofu Spring Rolls.   They are healthy, seasonal, and easy.

I always set out all the fixings, and each guest assembles her/his own.  I always find that this setup makes dinner easy and fun.  When you're on a special diet, it also makes eating with friends a bit easier.  No one questions your food choices, and everyone has fun creating unique roll combinations.  I made mine vegetarian, but traditional Vietnamese rolls feature thin slices of pork belly or shrimp along with rice noodles.  These anti-inflammatory rolls were made with thin slices of browned tofu and soba for extra heartiness.  Cucumbers were perfect for crunch and their anti-inflammatory properties.  Lastly, carrots provided wonderful lutein for eye health.


Soba and Tofu Spring Rolls

(the rolls)
1 block of extra firm tofu
2 carrots, shredded
1 cucumber, halved and thinly sliced
1 head of red leaf lettuce, washed
soba noodles, cooked and cooled
rice paper wrappers

Drain and dry the tofu, squeezing out any excess water.  Divide the block into equally sized rectangles (approximately 8-10).  Drizzle about a tablespoon of olive oil into a hot pan.  Lightly pan fry the tofu slices until sides take on a golden color and a slightly crisp texture.   Transfer the browned slices onto a paper towel and cool until room temperature.  Slice the tofu into thin strips.

Submerge one sheet of rice paper into warm water, and then place the wet sheet onto a plate.  Arrange your roll's contents in the center of the wrapper.  I like to start with a small piece of lettuce, then layer on a small amount of soba noodles, carrots, cucumber, and tofu.  Bring up one edge of the wrapper and fold it over the contents.  Then lift up the right and left sides, one at a time, to the center.  (It should remind you of an open envelope.)  Finally, roll the rest into the final open seam.  With practice, you'll become a master roller.  The key is to keep your contents manageable--otherwise, you will burst the rice paper.  

(soy ginger dipping sauce)

1/3 cup soy sauce or tamari
1 Tbsp. grated fresh ginger
1 Thai chili, thinly sliced into rounds

Combine all ingredients in a small bowl.  
For extra kick, allow the ginger and chili to steep in the liquid.


Monday, July 2, 2012

A Cool Summer Treat


If you're an East Coaster like myself, you are probably sweltering in this persistent heat wave.  It can be hard to enjoy a sweet treat in hot weather especially when faced with ice cream, gelato, and sorbets.  So when I'm craving something cool and sweet, I turn to banana whip!

I have frozen blackberries on hand, but banana whip is really versatile.  Go naked and just stick with bananas.  Or add a dash of cocao powder.  The banana is great on its own but also provides a wonderful canvas for other flavors.  I love banana whip not only because it is delicious but most importantly, it is easy to make and incredibly healthy.

Contrary to popular belief, you don't need a Vitamix or a Champion Juicer.  I used my Cuisinart food processar/hand blender combo and it worked great.

Berry Banana Whip

1 frozen, very ripe banana
5-8 blackberries
nuts for topping
agave, optional

Slice the banana into small chunks.  
Toss all fruit into the blender and blend until creamy.  
Add agave if desired and blender until incorporated.  
I sprinkled some sliced almonds, 
but any traditional ice cream topping will do.  
I especially love a drizzle of chocolate!

Thursday, June 28, 2012

A Berry Green Smoothie!

My CSA veggie box has yielded me with plentiful greens--so much, that I am scrambling to eat them all before they go bad (or the next box arrives)!  Luckily, I've discovered the joys of the green smoothie, which makes good use of my CSA veggies.

Most other green smoothie recipes yield literally green smoothies.  Because I used blackberries, mine took on a deep, pink hue.  Additionally, I used beet greens because that was what I had on hand, but you can easily throw in kale or spinach.  Surprisingly, the smoothie turned out sweet with a mild vegetal flavor.

Berry Green Smoothie
Serves 1

1 small partially frozen banana
1/2 apple, cored
1 c greens (loosely packed and chopped)
1/3 cup of non-fat Greek yogurt
1/4 c berries
water, as needed for consistency

* All ingredients can be tailored to your tastes.  Add more fruit for sweetness or some agave.

Toss all ingredients into a blender and blend until smooth.


Enjoy on the go or my favorite...on a sunny balcony. :)

Thursday, October 6, 2011

Here Fishy Fishy


Fish has always been my preferred meat of choice, so I was delighted when I discovered the canned sardine. As a kid, I used to eat them with saltine crackers. However, as I got older, I simply forgot about sardines. No one I knew ate them, so it was easy to forget they even existed.

Then came Hurricane Irene.

After watching a flurry of frenzied news reports predicting imminent doom, I decided to be safe and head out to the grocery store. I decided that canned sardines would be a tasty storm treat and headed home with a couple tins of Wild Planet sardines packed in extra virgin olive oil. I was thrilled to find that were even tastier than I remembered and fit perfectly into my anti-inflammatory diet. Sardines are rich in omega-3s and packed with calcium, especially if you eat the bones. I particularly like the Wild Planet brand because the fish are not overly soaked, and the fish are wild caught.

My sardine love affair continued. I now bring a can to lunch and munch happily away, sopping up the savory oil with two pieces of multigrain bread. It's a filling lunch that doesn't leave me overly full. I also appreciate that I don't need to refrigerate it, so it's a convenient option too.

A girl can only eat so much sardine straight from the can, though. Thus, I was pleasantly surprised to find an email today entitled "Your Perfect Sandwich" (from my perfect special someone) with a link to Alton Brown's Sherried Sardine Toast. It marries my love of avocado and sardine into a warm, open-faced sandwich. It's pretty tasty. I definitely recommend it! For a gluten-free alternative, these would work just as well on warm tortillas.

Next time I make these I think I'll play around with flavor combinations. Perhaps one with a drizzle of hot sauce. Or another with some crushed garlic. Tonight, I simply splashed an extra does of the sherry vinegar on top, and it was healthfully delicious. (Oh, by the way, it's definitely worth it to splurge the extra few dollars on sherry vinegar--the flavor is tart but with a wine undertone to cut the abrasiveness.)